Showing posts with label fashion. Show all posts

Monday, April 17, 2017

Jackets

I have always loved Jackets. When McCalls sponsored a Bomber Jacket Sew Along last fall, I decided it might be fun to sew along and try out their patterns using materials from my stash. 

First I made a sample jacket from Butterick 6181. I added black piping around the sleeve seams, stripes on the bands for interest, and a lining. It was easy to make and turned out well, but I did not care for the shape. 


I was afraid  McCalls 7100 would fit too much like a sweatshirt, but gave it a try and was pleasantly surprised. I loved the fit. I used brown faux leather for the front and back, and a very soft, lightweight brown denim for the sides and arms. 


I embellished the front with the Painted Roses design, #4079, from Urban Threads. The jacket pattern has no lining, but as I love lined jackets I added one in a blue and brown stripe.


I liked the fit and style of this jacket so much I made a second one. This time I used a soft black faux leather for the body, and a heavy wool-like polyester for the sleeves and sides and I lined it with black brocade. Cuffs, collars, and zippers were purchased from WAWAK. This jacket is very warm. I embroidered Urban Threads #1454 Koi and Lilies on the back, and one single lily on the front.


I added a cell-phone-sized welt pocket to the front of the lining and embellished it with a tiny dragon applique created using Urban Threads #13803, Passport to China-Dragon.


The challenge is long over, but I wanted to make a spring jacket. I spent a lot of time distressing and fatiguing my army green cotton duck yardage to soften it and give it some character. I used the washer, dryer, and clothesline, along with a variety of laundry products for this. Butterick 5927, view D was my starting point. This basic double breasted pattern is very simple and lends itself to achieving the military look I was after. 


I made the sleeves the focal point of the jacket. I carefully combined the upper sleeve of B5927 and the lower sleeve of V1036, eliminating the bell shape at the bottom. I love the seaming detail on the Vogue sleeve. 


I embroidered Urban Threads #6403 Elven Court Knot Cascade as a monocolor design on the top half of the sleeve prior to assembly. I also added plackets to the shoulders using a shortened version of the back placket pattern. The jacket has a dark green peach skin lining and military style buttons. It is extremely comfortable to wear. 


Jacket season is almost over until fall- or is it? If I have time in the busyness of summer, I just might make myself a sheer bomber jacket.

Thursday, September 27, 2012

Pattern Drafting, Edwardian Style


For years I have drooled over books like The Edwardian Modiste, the Voice of Fashion, and 59 Authentic Turn-of-the-Century Fashion Patterns.


 I have never been good with math, and could not grasp how one turned those doll sized patterns into something that would fit a person. 


This summer I found a video tutorial by Jen of the blog http://www.festiveattyre.com/ in which she both explains and demonstrates the apportioning rulers in the Edwardian Modiste. While watching it, the little light in my brain turned on and suddenly it all made sense. Whoever developed that system was a mathematical genius.

Now I am happily drafting patterns. 


I am currently working on a show set in 1905, and being able not only to use these patterns but to draft them to the size of the intended wearer is fantastic. They are short on directions, though, which you might find a bit daunting if you are not a confident sewer. The first pattern I drafted is a simple corset cover, and it turned out quite well.


 I have also drafted this one, and hope to get it cut out this week. I am really looking forward to making it up.


Thursday, May 17, 2012

Bubble Skirts and Black Binding

I was recently reminded of the importance of getting our of my box. 
I work on a lot of weddings. I make prom dresses and other custom garments. I do a lot of theater. My favorite shows are what I refer to as "big skirt shows"- if it requires a petticoat to make the ladies skirts look right, then it is my kind of show. 

The musical I worked on this spring was definitely not that kind of show. The director wanted our production of Seussical to look like a brightly colored, animated Dr. Seuss book. It was good for me. It stretched me- made me step outside my box, think new thinks, and try new things.


Once the show was over, my next task was a custom prom dress. As I worked on it, I realized that two of the techniques I had used on Seussical costumes would greatly enhance this dress. The Seussical bird girls had bubble skirts that were full, fun, and bouncy. 


The prom dress was floor length, but bubbling it made the drape and the bunches hang beautifully. We used hundreds of yards of black binding to give the Seussical costumes that cartoon look. The prom dress had a multi colored, draped shoulder bow. Adding black binding to it made it pop and pulled the elements of the dress together. 


I don't think this would have occurred to me if I hadn't just used the technique elsewhere, which makes my point. To stay fresh and creative, you need to step outside your usual zone. Mix it up. Read blogs, see a show, look at and analyze pictures of other designer's work, try a new technique, take a class or experiment with other art forms. Think outside the box. Think new Thinks. You'll be glad you did!


Wednesday, March 28, 2012

Little Black Dresses

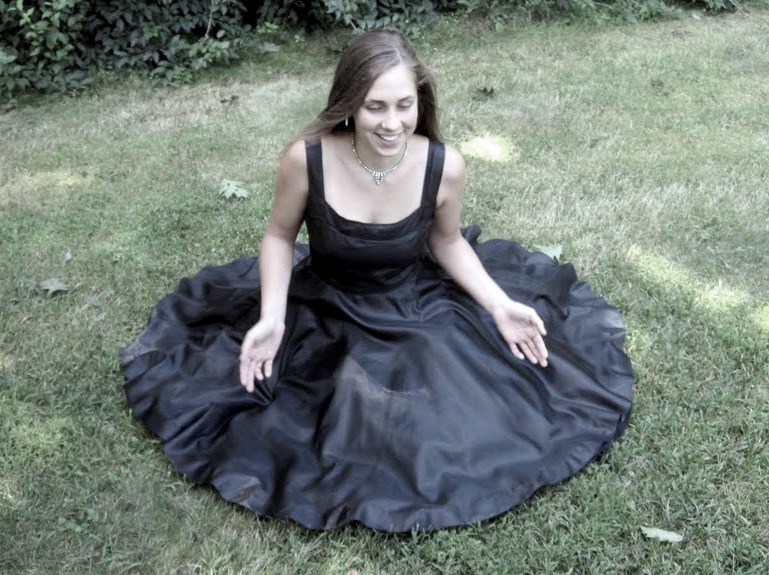
I have made a number of little black dresses over the years. They are wonderfully versatile. I confess to having favorites among the ones I have made- here are three of them.

A couple years ago, I made a little black dress that was inspired by a grey Vera Wang wedding gown. 


The long, many layered gown was cropped into a knee length skirt made of georgette and taffeta. The strapless bodice gained gently curving halter straps. Draping and pattern making for this dress was somewhat challenging, but I was quite satisfied in the end.

Another dress- and a sleeveless over coat- was inspired by an AlexanderMcQueen ensemble. The base dress was a 1950’s style black taffeta number with lots of tulle netting under the skirt to make it poufy. 


The coat was fun to make- I had to call up a blend of my design and tailoring skills.


Dress number three made its’ debut in December 2011. A friend and I had attended a concert by Charmaine in August. Her dress was the inspiration.


The dress she wore had layers of zipper trimmed tubes overlaying the skirt. Katie really liked it, so the journey to create a unique version of it for her began. We played with several different design ideas and several different bodices before we settled on this one. 


We decided to add a shrug that could be worn with the dress in cool weather, or with jeans, or anything else. The shrug is available as a custom made item in my Etsy Shop, where there are more detailed photos.


Long live the little black dress!

Sunday, March 25, 2012

The Celtic Shrug

Every now and then I make something that I really love. The Celtic Shrug is one of those pieces. The idea grew out of a black shrug in a similar style that I made for a friend. Both shrugs were made of high quality pleather, and both featured specially made lace embroidery that I created with my embroidery machine. That is where the similarity ends. The brown shrug was destined to be the Celtic Shrug from day one. In my mind, I could already see the rich brown pleated taffeta on the ends of the lace sleeves.

I knew what color threads I wanted to use for the Celtic knot on the back. The hardest part was locating some really nice brown taffeta for the pleats and lining.

I started by making the embroidery on a piece of netting.
Once I cut out the shrug pieces, I sewed the embroidery to the center back, and cut out the pleather behind it ever so carefully. 


I added an inner layer of netting for stability. Once it was all assembled, I cut a hole in the lining behind the embroidery and turned under the edges. 


The sleeves are my favorite part, I think. Or then again, maybe it's the back. The shrug lasted one whole hour in my Etsy Shop and seems to have found a happy home.  J


Wednesday, March 7, 2012

The VPLL Titanic Sewing Project

Along with about 400 others, I am a test sewer for the Vintage Patterns Lending Library’s 1912 Titanic Sewing Project- http://vpll1912project.org/.  The idea is to test the patterns transcribed from the 1912 La Mode Illustree by Janyce Hill of VPLL by making a muslin to see if the pieces fit together properly and work as a garment. My first test pattern is the Princess Slip.

Many of the sewers are making costumes for their own use, as they do reenactments or attend Titanic memorial events. I design and make costumes all the time for theatrical productions, but I am not inclined to wear them myself. I would never make a detailed garment like this slip unless someone, such as the audience, got to see it. I am also a big fan of (potentially) wearable muslins. As I studied the pattern, I realized that with a few small changes it might yield a rather nice evening gown. I dug through my stash and found a leftover piece of my favorite black silk georgette that looked large enough.  My decision was made.

My grandmother was a professional seamstress back in the days when every hem and seam finish was done by hand. She owned what then was a top of the line sewing machine. If she’d had the tools at her disposal that I have, I am certain she would have used them.  I feel no guilt in allowing my Berninas to do so much work that was once done by hand.

The biggest problem was actually assembling the pattern pieces. I have downloaded and assembled a number of other e-patterns. Assembly generally requires 5 minutes or less. Some of these pieces have little or no markings on them, and if you get them out of order(which I did!) you’re sunk. The corner markings didn’t print on my printer, either. Page numbers and/or piece ID on each page would fix this problem.

I opted to make the lining and pleated flounce in black taffeta. It was not available locally (by local I mean the JoAnn’s that is 50 miles from my house). Fabric.com informed me four days after I ordered that they didn’t have the quantity I needed.  

Thankfully, http://www.fashionfabricsclub.com/ did. It is excellent quality, wider, and as a bonus was less expensive than my first order. I could not find black insertion or edging lace locally that was even remotely appropriate, either. I bought a piece of black overall lace and cut it into strips.

 I chose this lace because I thought it had a tight enough weave to be stable when used this way. 


It required careful handling, but it worked.  I cut up the lace while my Bernina did a spot of embroidery on the front of the gown. Then I sat down to sew.