Friday, November 30, 2012

Sew Unique Holiday Decor


Are you tired of the Mass manufactured Christmas look, but not sure what else to do? Here are several ideas for making your own simple, thrifty, and attractive decorations that I have gathered from across the internet. Instead of shopping, spend your free time creating things for your home. Check out these links and pick a couple things to try this weekend.

You never know what you might find on the Instructables website. In this case, I found sewn Christmas cards- using paper and fabric. It would be really easy to customize this project to your own taste, and the sewing involved is really simple.

The blog sew like my mom has a great tutorial for making fabric Christmas stockings.

There are a number of versions of a kid friendly felt, wall mounted Christmas tree on the internet. There is a nice tutorial here. Kids can spend hours decorating and undecorating their own tree without making a mess of yours. 

Try making these owl ornaments, or this cute pickle in a Santa hat.

You can create endless variations on these sock snowmen. Make a couple or a dozen.

Happy Sewing!

Tuesday, November 27, 2012

Handmade Gift Ideas

Since the Holidays are fast approaching, I thought I would suggest a few easy to make gift ideas that even beginning sewers can make well and be proud of.

A pillowcase. There are several great ideas here:
 http://tipnut.com/pillowcase-patterns/

A rice bag. For instructions,go to:
http://www.craftsy.com/pattern/sewing/other/rice-bag/12915

An apron worthy of your party guests:
http://craftstew.com/sewing/38-free-apron-patterns

A jewelry roll for your traveling friends. A free pattern is available here:  http://blog.fabric.com/2011/09/hotpatterns_bijoux_baby_jewelr.html

A trendy sumatra bag:
http://www.fabric.com/creativity-headquarters-free-pattern-downloads-sumatra-bag.aspx

What are you waiting for? Start sewing!  :)

Thursday, November 15, 2012

Three Simple Seam Finishes

If finishing the seams in your garments is not something you usually do you might ask why it is important. Here are my top 4 reasons for finishing your seams:

-It prevents raveling of woven fabrics, especially during heavy use and laundering.
-It helps a garment maintain its shape.
-It makes the garment more durable.
-It makes your garment neat and professional looking.

My tailoring instructor told us that our garment should look so good on the inside, that if we accidentally put it on inside out no one would notice. There are many seam finishing techniques and stitches out there, especially for knits, but everyone should be able to manage at least one of these 3 general purpose seam finishes.

#1- Pinking
Once you are sure the garment fits well, use a pair of pinking shears to trim the raw edges. That's all there is to it!


#2- Zig Zag
This is a great finish for many fabrics. Set your machine to a very short length zig zag stitch.  When working on delicate fabrics that ravel easily and are otherwise hard to handle, I press the seam allowances to one side rather than open, and zig zag the edges together. If you have your stitch set small enough, you can actually get the machine to roll the raw edge. I have also used a tight zigzag finish to roll sheer hems. Pressing with starch or vinegar spray prior to finishing lightweight fabrics, especially hems, will result in a better end product.


#3 Mock French Seam
Press the seam open.Then press each of the raw edges towards the center. Pull them together, raw edges to the inside. Pin and straight stitch. This is a great seam finish for garments that will take hard use. I often use in men's shirts.


Tuesday, November 13, 2012

Make Your Own Trims

Trims can be expensive. Consider making your own. They are fun to make, and instead of having that made in China look, they will be unique. The possibilities are endless, but here are several simple ideas to get your creative juices flowing. 

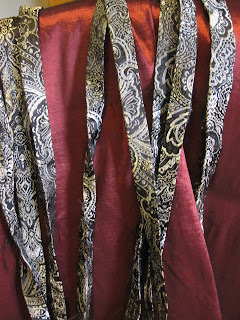
-Cut a straight piece of fabric on the grain that is twice the width you desire plus 1/2". Fold and press it in half the long way, then stitch the raw edges together. Press  the raw edge under just past your stitching line, @ 1/2" from the raw edge. Pin and sew in place. I used this technique on the tunics pictured here. I got a yard of brocade on sale for $5 and did all of them with fabric to spare.
  

-Hand gather a piece of ribbon or fabric in a zig zag pattern, being careful to loop the thread over the edge.


The next and final step is to pull the gathering thread, adjusting it evenly. All you have to do now is sew it in place.


You can also coil it into a  zinnia-like flower.


-Another way to manipulate fabric for trim is to gather ribbon or fabric you have made into bias tape along both edges evenly, then sew in place.

-If you have an embroidery machine, your choices are endless. You can embroider any long, straight design on the fabric or ribbon of your choice, like I did for the trim on this bodice. I embroidered several rows of this design on satin charmeuse, pieced them together, and pressed under the raw edges. I sewed it on with silver thread that matched the Celtic knot design.


Thursday, November 8, 2012

Four Tickets to Christmas

I know- I am way behind on the 31 days of sewing tips. I have been overwhelmingly busy getting a show ready for the stage. We open on Thursday night in Mayville, NY at the Chautauqua Inn & Conference Center- the first weekend of a 5 stop tour. The show is called Four Tickets to Christmas. It is set in 1905. Many of the costumes are made from vintage patterns I scaled to size with apportioning rulers (see Pattern Drafting, Edwardian Style). 

If you live near one of the venues, come see it. Did I mention it is a dinner theater? Great food, too. Tickets are available here: http://www.fln.org/events/event/350911-2012-11-08-four-tickets-to-christmas/


The 31 days will resume shortly- thank you for your patience! And I hope to have some decent show photos soon, too.