Friday, November 6, 2015

The Steampunk Gunslinger- Key to my Heart

I really enjoyed designing and making this costume. I am not sure why I find the whole leather and lace, metal and fabric thing so compelling, but I do. Perhaps it is the juxtaposition of femininity and strength on display. At any rate, this was both complicated and fun to make.


I challenged myself to work primarily from my stash. In the case of the skirt, this meant creating the fabric I needed for the middle of the three layers. I knew what I wanted and was willing to violate my "work from the stash" rule for this but could not find what I wanted anywhere- a tan with black satin stripe, like you used to see in jacket linings. But once again, necessity was the mother of invention! I started with some pale yellow taffeta from the stash and a partial package of tan dye. After doing a couple test samples I got just the right color. I used my embroidery machine to add the Kraken and tentacles designs by Urban Threads. I made the stripes with a tiny black zig zag stitch. In the end I was glad I did not find the right fabric, because I like what happened so much more.


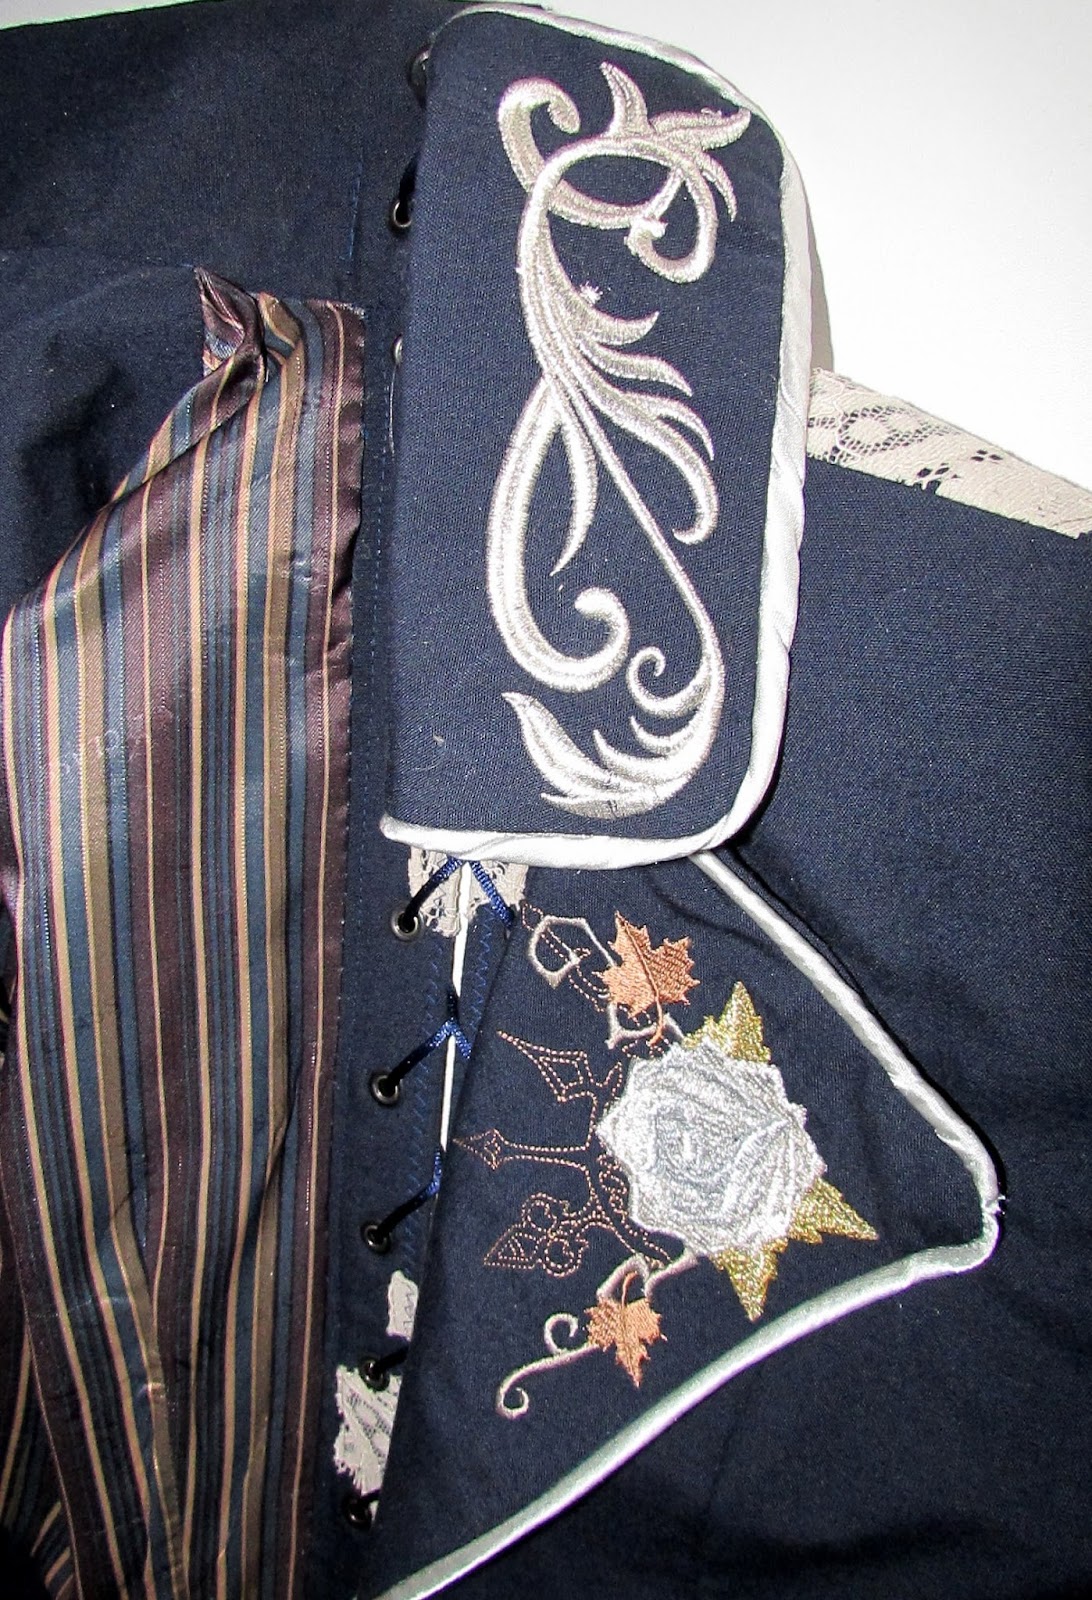
I made a cross hatched pattern of pintucks in black thread for the front side panels. I used a tape measure and iron to mark guide lines. The lace edged underskirt was part of a thrifted skirt in my stash.


Here is the finished product. Lots of labor, but it was worth it!


The outer skirt is made of black cotton twill embellished with rivet trim, brass buttons, and embroidery on the back.


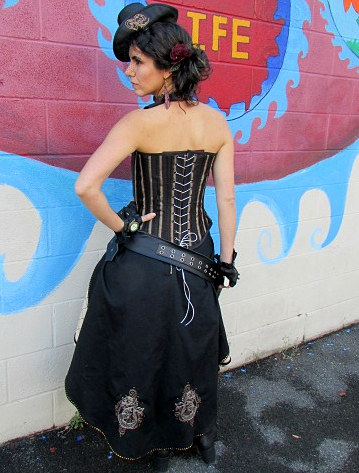
The corset is made of a very sturdy upholstery fabric, boned with rigilene, and lined with black satin. It has heavy duty grommets down the back, a modesty panel, and a halter strap. The overlay on the front is made of high end pleather. I embroidered a gold keyhole, cut out the center, and backed it with a shimmery red fabric. The functional black and silver zipper is surrounded by metal brads.


I upcycled a pair of leather gloves I bought for $2 at the thrift store. After removing the wool lining, I cut off the fingers and made tucks on the back of the hand and inner wrist to shape them. Then I added an assortment of embellishments, most of them from my collection. The only ones I bought for this costume were the spikes on the knuckles.


The hat was inspired by one worn by Lady Rosalind in an episode of Downton Abbey.


It is made out of craft foam and satin taffeta. 


I have never used craft foam as a hat base before, but it seemed like it might work, and I am nothing if not experimental. It actually worked out really well. I embroidered the taffeta before covering the hat. There is embroidery on both the front of the hat and the underside of the (turned up) brim. The face veil added the final touch. To help keep the hat on the head, I added bobby pin loops to the underside. 


The gun belt is a mix of leather and buckles from my stash and a thrift store belt. I made a paper pattern for the holster by draping it over the gun. I added an all seeing eye embroidery design to the holster, and sewed a tiny diamond button in the center of the eye.


The gun is a nerf gun painted with craft paint.


The finishing touches- choker, earrings, and rose in the hair- all begin with freestanding lace made on the embroidery machine. I added chains, metal rounds, and a key to the choker and metal feathers to the earrings. The rose was sewn to a hair clip.


The outfit can be worn with or without the shrug, which I had previously made from high end cream colored pleather and stretch lace. The back features an openwork embroidered circle. The sleeves are trimmed with lace and brass buttons, and the front is decorated with a Victorian style pin.


Tuesday, October 27, 2015

The Petite Lace Wedding Dress


I made a custom lace wedding dress this summer for a very petite bride- she is under 5' tall. She is perfectly proportioned, which actually is the problem. Wedding dresses for petites are rare; for the very petite, they are nonexistent. Everything she tried on was too long or too large in ways that didn't match the sizing in other areas. Alterations would have been difficult and expensive if they could have been done at all. I had sewn for her before, so was anticipating this problem. I measured carefully, then made a muslin and tweaked it repeatedly until the fit was perfect. 

Once I had the fit right, I began by cutting and sewing the lining, then moved on to the bridal satin and vera knit, which would hold the lace appliques.


FYI, Vera knit is not the same as tulle or bridal illusion. It is a delicate looking but sturdy knit fabric that resembles tulle. It drapes perfectly.


The dress has functional buttons on the bodice, and ornamental buttons on the skirt.


The style and sewing were relatively simple to construct, but I spent many, many hours cutting out tiny lace flowers and motifs and sewing them into place. The appliques are closely spaced on the bodice and sleeves, and farther apart on the skirt, where they trickle down the sides. I also created a design of lace applique flowers and  motifs on the train.


The lace had a scalloped edging, which we used to trim the hem, neckline, and sleeves.


Her dress was very comfortable because it fit so well, and she was relaxed and radiant all day. She was a beautiful bride.


Planning a wedding? Read my blog entry on finding a dress that is perfect for you here.


Saturday, October 3, 2015

Steampunk Corset Jacket

The idea for this jacket had been rolling around in my head for a while. Fall is a very busy time for me, and even though I was buried in work, a design contest at Urban Threads motivated me to get it done. Sewing time was dear. Between doing alterations for others and gathering and canning my garden produce, it was a stretch to get it done. It was worth it, though- the jacket won!
I really enjoyed making it- lots of photos below!


I started by making a pattern. The math was more complicated than usual. This jacket is unique in that it is made in two individual pieces. The lacing up the back literally holds it together. Embroidery and lace work had to be planned out very carefully in advance, and done before the jacket was assembled. All the embroidery was done with an embroidery machine. 


The most challenging embroidery was the cut work on the lower sleeve. There was stitching, then cutting, and thread changes, then the addition of soluble stabilizer. It was worth the effort, though! I backed the cut work in silver satin. I also made piping of silver satin for trim. 


Lace cutouts needed to match down the back and be in place before I inserted the grommets. I used top quality metal grommets for the lacing, as well as boning next to the grommets so the jacket won't lose it's shape.


The lapels are embroidered with a steampunk clockwork rose pattern from Urban Threads- the creator of all the designs used on this jacket.


Metal rivets, hot fix metallic studs, and decorative silver buttons add the finishing touches. The jacket closes with heavy duty hooks tucked in behind the silver piping so they are not visible. The jacket is fully lined in a jaunty navy and brown stripe.


If you are interested in owning this jacket, it is available here: Corset Back Jacket


Monday, September 21, 2015

Cersei Lannister's Red Dress

Game of Thrones has fabulous costumes. They are beautifully designed and lavishly embroidered. I fell in love with Cersei Lannister's red dress, generously embroidered with gold, and decided to make an attempt at recreating it. 


I used Simplicity pattern #1487 and tweaked it a bit. 


I made the dress using three colors of  linen- red, flax, and gold. I used my embroidery machine to create most of the embroidery, since I have arthritis in my hands. The designs are a little different than the ones on the original dress for that reason. To make the designs curve around the neckline properly, I embroidered them on gold silk organza, cutting the extra organza away and clipping where necessary to make them curve. This technique also gave the designs more loft. I sewed them in place with large, widely spaced machine zigzag stitches of the same thread. I was able to embroider the lions directly onto the dress. These amazing designs come from Urban Threads. You should check them out.


I finished the basic dress and gold embroidery nearly a year ago. We took some photos, and then I set it aside until I had time to finish it.


I started working on the dress again in August 2015 and completed it later that month. I made the birds and flower buds using free motion embroidery on my regular sewing machine. The beading was done by hand. The tail feathers are real.


I also added a belt that I made. I think it turned out pretty well. 


Many thanks to my friend Katie Bernier for once again being my model.


If you are interested in owning this dress, it is available at: Cersei Lannister's Red Dress