I really enjoyed designing and making this costume. I am not sure why I find the whole leather and lace, metal and fabric thing so compelling, but I do. Perhaps it is the juxtaposition of femininity and strength on display. At any rate, this was both complicated and fun to make.

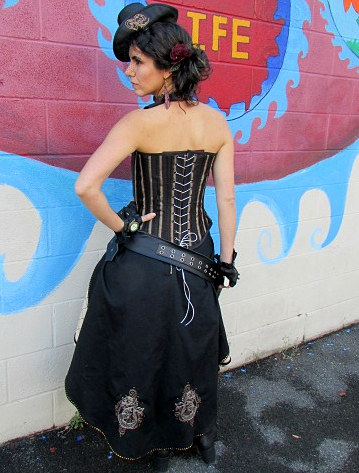
I challenged myself to work primarily from my stash. In the case of the skirt, this meant creating the fabric I needed for the middle of the three layers. I knew what I wanted and was willing to violate my "work from the stash" rule for this but could not find what I wanted anywhere- a tan with black satin stripe, like you used to see in jacket linings. But once again, necessity was the mother of invention! I started with some pale yellow taffeta from the stash and a partial package of tan dye. After doing a couple test samples I got just the right color. I used my embroidery machine to add the Kraken and tentacles designs by Urban Threads. I made the stripes with a tiny black zig zag stitch. In the end I was glad I did not find the right fabric, because I like what happened so much more.

I made a cross hatched pattern of pintucks in black thread for the front side panels. I used a tape measure and iron to mark guide lines. The lace edged underskirt was part of a thrifted skirt in my stash.


Here is the finished product. Lots of labor, but it was worth it!

The outer skirt is made of black cotton twill embellished with rivet trim, brass buttons, and embroidery on the back.

The corset is made of a very sturdy upholstery fabric, boned with rigilene, and lined with black satin. It has heavy duty grommets down the back, a modesty panel, and a halter strap. The overlay on the front is made of high end pleather. I embroidered a gold keyhole, cut out the center, and backed it with a shimmery red fabric. The functional black and silver zipper is surrounded by metal brads.

I upcycled a pair of leather gloves I bought for $2 at the thrift store. After removing the wool lining, I cut off the fingers and made tucks on the back of the hand and inner wrist to shape them. Then I added an assortment of embellishments, most of them from my collection. The only ones I bought for this costume were the spikes on the knuckles.


It is made out of craft foam and satin taffeta.


I have never used craft foam as a hat base before, but it seemed like it might work, and I am nothing if not experimental. It actually worked out really well. I embroidered the taffeta before covering the hat. There is embroidery on both the front of the hat and the underside of the (turned up) brim. The face veil added the final touch. To help keep the hat on the head, I added bobby pin loops to the underside.

The gun belt is a mix of leather and buckles from my stash and a thrift store belt. I made a paper pattern for the holster by draping it over the gun. I added an all seeing eye embroidery design to the holster, and sewed a tiny diamond button in the center of the eye.


The gun is a nerf gun painted with craft paint.


The finishing touches- choker, earrings, and rose in the hair- all begin with freestanding lace made on the embroidery machine. I added chains, metal rounds, and a key to the choker and metal feathers to the earrings. The rose was sewn to a hair clip.


The outfit can be worn with or without the shrug, which I had previously made from high end cream colored pleather and stretch lace. The back features an openwork embroidered circle. The sleeves are trimmed with lace and brass buttons, and the front is decorated with a Victorian style pin.


