Showing posts with label corset. Show all posts

Friday, June 7, 2019

Cosplay Costumes


Costumes aren’t just for Halloween any more. Cosplay- dressing and acting the part of characters apart from the stage-  is really popular.  Comic con is a comic book and related arts convention, often space themed. Fans gather to meet artists, other creators, and each other- and often dress up as favorite characters. There are panels, book and art signings, and costume contests. There are similar cons for other areas of interest, some huge, some small.

My daughter writes Science Fiction and Post Apocalyptic YA books. She attends several Comic con events each year as a vendor, as it is good place to meet prospective readers. It wasn’t long before she decided that she wanted to dress up for events.

Her favorite Sci Fi show is Dr. Who, so we started there. The first costume was a very long, multi colored scarf (knitted by me) and a hat, representing the 4th Doctor, Tom Baker.


The second costume request was for a Tardis Costume (The Tardis is the British blue phone book look-a-like space ship the Doctor travels through space in- see previous photo). She had seen several variations on this theme at a Comic con. We used Simplicity 1095 as a starting point.


We made some significant changes. I shortened the corset about 4” for ease of movement, as it would be worn while working. The corset was quite straightforward to make, but lining up the designs on the front was rather picky. It laces up both the front and the back, and requires some help to put on.


We eliminated the long skirt and bustle, using just the short skirt with the addition of netting underneath. It is worn over leggings and boots. The shrug with attached hood completes the costume, and snaps to the corset on either side to hold it in place.


It has been worn a lot, and has held up well.


http://www.arielesieling.com/http://www.arielesieling.com/
https://www.facebook.com/pg/arielejsieling/https://www.facebook.com/pg/arielejsieling/

But costumes are like potato chips- one is never enough. 
Next time- the Steampunk Slytherin Costume.


Friday, November 6, 2015

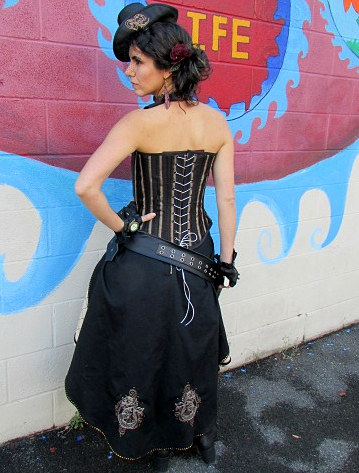
The Steampunk Gunslinger- Key to my Heart

I really enjoyed designing and making this costume. I am not sure why I find the whole leather and lace, metal and fabric thing so compelling, but I do. Perhaps it is the juxtaposition of femininity and strength on display. At any rate, this was both complicated and fun to make.


I challenged myself to work primarily from my stash. In the case of the skirt, this meant creating the fabric I needed for the middle of the three layers. I knew what I wanted and was willing to violate my "work from the stash" rule for this but could not find what I wanted anywhere- a tan with black satin stripe, like you used to see in jacket linings. But once again, necessity was the mother of invention! I started with some pale yellow taffeta from the stash and a partial package of tan dye. After doing a couple test samples I got just the right color. I used my embroidery machine to add the Kraken and tentacles designs by Urban Threads. I made the stripes with a tiny black zig zag stitch. In the end I was glad I did not find the right fabric, because I like what happened so much more.


I made a cross hatched pattern of pintucks in black thread for the front side panels. I used a tape measure and iron to mark guide lines. The lace edged underskirt was part of a thrifted skirt in my stash.


Here is the finished product. Lots of labor, but it was worth it!


The outer skirt is made of black cotton twill embellished with rivet trim, brass buttons, and embroidery on the back.


The corset is made of a very sturdy upholstery fabric, boned with rigilene, and lined with black satin. It has heavy duty grommets down the back, a modesty panel, and a halter strap. The overlay on the front is made of high end pleather. I embroidered a gold keyhole, cut out the center, and backed it with a shimmery red fabric. The functional black and silver zipper is surrounded by metal brads.


I upcycled a pair of leather gloves I bought for $2 at the thrift store. After removing the wool lining, I cut off the fingers and made tucks on the back of the hand and inner wrist to shape them. Then I added an assortment of embellishments, most of them from my collection. The only ones I bought for this costume were the spikes on the knuckles.


The hat was inspired by one worn by Lady Rosalind in an episode of Downton Abbey.


It is made out of craft foam and satin taffeta. 


I have never used craft foam as a hat base before, but it seemed like it might work, and I am nothing if not experimental. It actually worked out really well. I embroidered the taffeta before covering the hat. There is embroidery on both the front of the hat and the underside of the (turned up) brim. The face veil added the final touch. To help keep the hat on the head, I added bobby pin loops to the underside. 


The gun belt is a mix of leather and buckles from my stash and a thrift store belt. I made a paper pattern for the holster by draping it over the gun. I added an all seeing eye embroidery design to the holster, and sewed a tiny diamond button in the center of the eye.


The gun is a nerf gun painted with craft paint.


The finishing touches- choker, earrings, and rose in the hair- all begin with freestanding lace made on the embroidery machine. I added chains, metal rounds, and a key to the choker and metal feathers to the earrings. The rose was sewn to a hair clip.


The outfit can be worn with or without the shrug, which I had previously made from high end cream colored pleather and stretch lace. The back features an openwork embroidered circle. The sleeves are trimmed with lace and brass buttons, and the front is decorated with a Victorian style pin.


Saturday, October 3, 2015

Steampunk Corset Jacket

The idea for this jacket had been rolling around in my head for a while. Fall is a very busy time for me, and even though I was buried in work, a design contest at Urban Threads motivated me to get it done. Sewing time was dear. Between doing alterations for others and gathering and canning my garden produce, it was a stretch to get it done. It was worth it, though- the jacket won!
I really enjoyed making it- lots of photos below!


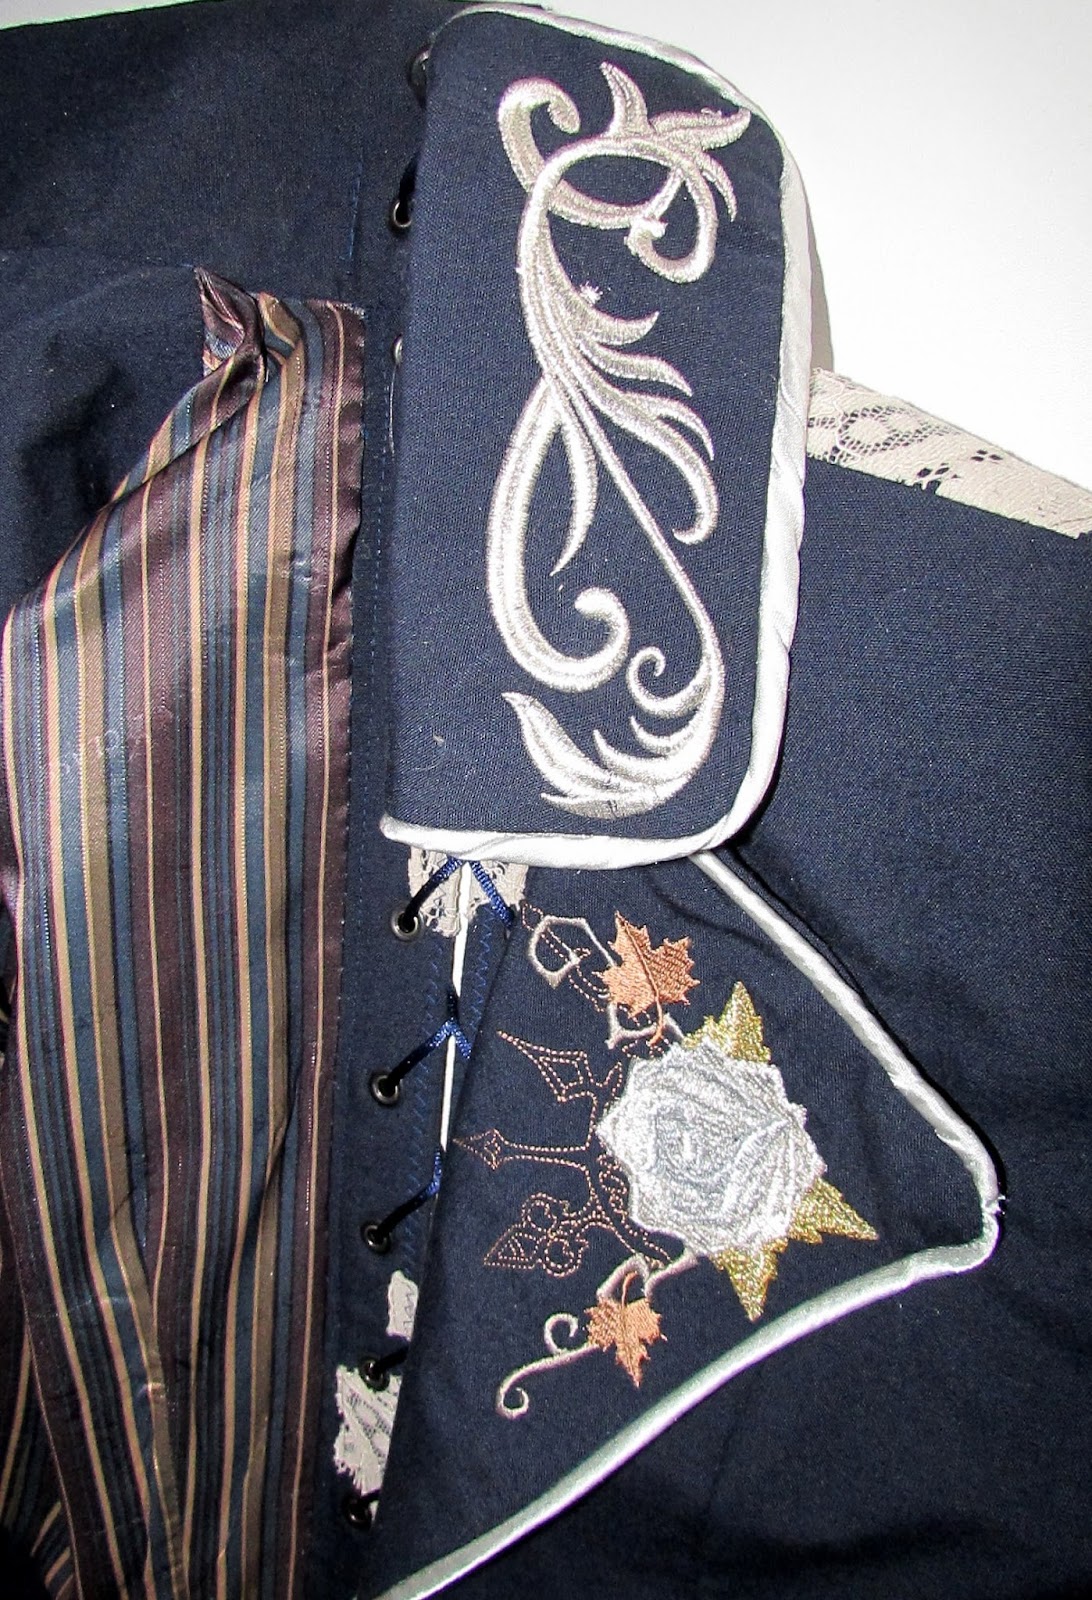
I started by making a pattern. The math was more complicated than usual. This jacket is unique in that it is made in two individual pieces. The lacing up the back literally holds it together. Embroidery and lace work had to be planned out very carefully in advance, and done before the jacket was assembled. All the embroidery was done with an embroidery machine. 


The most challenging embroidery was the cut work on the lower sleeve. There was stitching, then cutting, and thread changes, then the addition of soluble stabilizer. It was worth the effort, though! I backed the cut work in silver satin. I also made piping of silver satin for trim. 


Lace cutouts needed to match down the back and be in place before I inserted the grommets. I used top quality metal grommets for the lacing, as well as boning next to the grommets so the jacket won't lose it's shape.


The lapels are embroidered with a steampunk clockwork rose pattern from Urban Threads- the creator of all the designs used on this jacket.


Metal rivets, hot fix metallic studs, and decorative silver buttons add the finishing touches. The jacket closes with heavy duty hooks tucked in behind the silver piping so they are not visible. The jacket is fully lined in a jaunty navy and brown stripe.


If you are interested in owning this jacket, it is available here: Corset Back Jacket


Thursday, January 10, 2013

Making it Real

On stage and screen, actors transform into characters from another time and place. Take, for example, a show like Downton Abbey, or a movie like Les Miserables or the Hobbit, in which the fantasy seems so real - it makes you feel as though you've stepped into another place or time. How do they do that?

It's all in the details.
I am a costumer, so that is my focus, but the principle applies across the board. Colors, velvet vs. fabric ribbon, buttons made out of bone or covered buttons, fabric types, and the style of lace are just a few examples of things that can make a much bigger difference than you might think. There is no substitute for research. Use online resources, books, museums, and films that are known to be accurate representations of the time period. The more you know, the easier it will be to pick fabrics, trims, accessories, and even thrift store garments that fit the time period. I choose pictures- photos of people and museum pieces and fashion plates- for each character and use them throughout the process as reference points. Sometimes when a costume doesn't look quite right I go back to the pictures and analyze them bit by bit until I figure out what detail is missing, or what modern detail I have inadvertently included that I need to remove. I just completed Four Tickets to Christmas, set in 1905. Here are a few examples of what I do.

Underwear matters.
The S corset and related underthings all help to create the female silhouette of the time period. We built corsets (on a very tight budget, that is a blog of it's own), corset covers, bustle and bust pads to shape the ladies.


Authentic patterns are great when you can get them. I used authentic patterns from 59 Authentic Turn of the Century Patterns and The Edwardian Modiste for the boy's suit and the ladies dresses. I also used the cover of a theater goers magazine from 1905 as a model for the dark green dress and hat. The photo is from the show; the pictures below it provided guidance and inspiration. It wasn't enough to make the garments- trimming them appropriately changed them immensely- especially the boy's suit.


Use existing pieces whenever you can- especially for the men. Suits and coats are labor intensive. The drawing on the left from Men's Fashion Illustrations from the Turn of the Century portrays the dapper urban gentleman of December 1905 we were trying to create. I made the white vest, tall collar and tie, but everything else was put together from vintage parts.


Sometimes only a little thing is required to transform a garment. The jacket with the lace collar is from The Voice of Fashion. I drafted just the collar pattern and added it to a simple cape. I picked up a straw hat at a thrift store and covered it with fabric before embellishing it.


Look to museum pieces for colors. The actress really liked this museum piece, so I did my best to replicate it. We made the jacket, had the blouse, and I tweaked a skirt we already had.


This costume was made entirely from existing parts.


Last but not least, we used vintage choreography to go along with the costumes.


If you would like to see more photos, click here.