Wednesday, December 5, 2012

Make a Simple, Stylish Fabric Headband


This is a great project for beginning sewers. It requires only a small amount of fabric and is easy to fit. You can use new fabric or recycle old t-shirts or other knit garments. Knit is the key word- the fabric must be stretchy.

Cut a piece of fabric or t-shirt that is 50” long and 4-5” wide. Sew this into a long, narrow tube. 


Make your seam @ ¼” wide, and stretch gently as you sew. If the raw edges try to curl under then press and starch before you stitch. Turn it right side out and press it with starch or a solution of 50/50 vinegar and water. Let it cool before you move it.


Now drape it around your neck so that the ends hang evenly in the front. Pick up the ends and bring them up to the top of your head as though you were going to tie them. Instead, wrap them around each other once so they go back down the side of the head the came up on. Pull gently until it is snug on your head, then bring the ends together at the nape of your neck. 


You should have room for an overlap of at least ½”. Keeping both loops together, remove the almost headband from your head. Pin the layers together and stitch through them. 


That is it- you are done! Make yourself several or make them for gifts.

Friday, November 30, 2012

Sew Unique Holiday Decor


Are you tired of the Mass manufactured Christmas look, but not sure what else to do? Here are several ideas for making your own simple, thrifty, and attractive decorations that I have gathered from across the internet. Instead of shopping, spend your free time creating things for your home. Check out these links and pick a couple things to try this weekend.

You never know what you might find on the Instructables website. In this case, I found sewn Christmas cards- using paper and fabric. It would be really easy to customize this project to your own taste, and the sewing involved is really simple.

The blog sew like my mom has a great tutorial for making fabric Christmas stockings.

There are a number of versions of a kid friendly felt, wall mounted Christmas tree on the internet. There is a nice tutorial here. Kids can spend hours decorating and undecorating their own tree without making a mess of yours. 

Try making these owl ornaments, or this cute pickle in a Santa hat.

You can create endless variations on these sock snowmen. Make a couple or a dozen.

Happy Sewing!

Tuesday, November 27, 2012

Handmade Gift Ideas

Since the Holidays are fast approaching, I thought I would suggest a few easy to make gift ideas that even beginning sewers can make well and be proud of.

A pillowcase. There are several great ideas here:
 http://tipnut.com/pillowcase-patterns/

A rice bag. For instructions,go to:
http://www.craftsy.com/pattern/sewing/other/rice-bag/12915

An apron worthy of your party guests:
http://craftstew.com/sewing/38-free-apron-patterns

A jewelry roll for your traveling friends. A free pattern is available here:  http://blog.fabric.com/2011/09/hotpatterns_bijoux_baby_jewelr.html

A trendy sumatra bag:
http://www.fabric.com/creativity-headquarters-free-pattern-downloads-sumatra-bag.aspx

What are you waiting for? Start sewing!  :)

Thursday, November 15, 2012

Three Simple Seam Finishes

If finishing the seams in your garments is not something you usually do you might ask why it is important. Here are my top 4 reasons for finishing your seams:

-It prevents raveling of woven fabrics, especially during heavy use and laundering.
-It helps a garment maintain its shape.
-It makes the garment more durable.
-It makes your garment neat and professional looking.

My tailoring instructor told us that our garment should look so good on the inside, that if we accidentally put it on inside out no one would notice. There are many seam finishing techniques and stitches out there, especially for knits, but everyone should be able to manage at least one of these 3 general purpose seam finishes.

#1- Pinking
Once you are sure the garment fits well, use a pair of pinking shears to trim the raw edges. That's all there is to it!


#2- Zig Zag
This is a great finish for many fabrics. Set your machine to a very short length zig zag stitch.  When working on delicate fabrics that ravel easily and are otherwise hard to handle, I press the seam allowances to one side rather than open, and zig zag the edges together. If you have your stitch set small enough, you can actually get the machine to roll the raw edge. I have also used a tight zigzag finish to roll sheer hems. Pressing with starch or vinegar spray prior to finishing lightweight fabrics, especially hems, will result in a better end product.


#3 Mock French Seam
Press the seam open.Then press each of the raw edges towards the center. Pull them together, raw edges to the inside. Pin and straight stitch. This is a great seam finish for garments that will take hard use. I often use in men's shirts.


Tuesday, November 13, 2012

Make Your Own Trims

Trims can be expensive. Consider making your own. They are fun to make, and instead of having that made in China look, they will be unique. The possibilities are endless, but here are several simple ideas to get your creative juices flowing. 

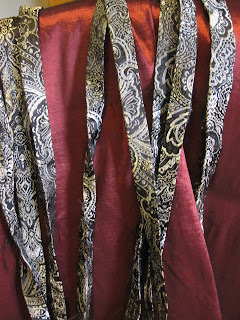
-Cut a straight piece of fabric on the grain that is twice the width you desire plus 1/2". Fold and press it in half the long way, then stitch the raw edges together. Press  the raw edge under just past your stitching line, @ 1/2" from the raw edge. Pin and sew in place. I used this technique on the tunics pictured here. I got a yard of brocade on sale for $5 and did all of them with fabric to spare.
  

-Hand gather a piece of ribbon or fabric in a zig zag pattern, being careful to loop the thread over the edge.


The next and final step is to pull the gathering thread, adjusting it evenly. All you have to do now is sew it in place.


You can also coil it into a  zinnia-like flower.


-Another way to manipulate fabric for trim is to gather ribbon or fabric you have made into bias tape along both edges evenly, then sew in place.

-If you have an embroidery machine, your choices are endless. You can embroider any long, straight design on the fabric or ribbon of your choice, like I did for the trim on this bodice. I embroidered several rows of this design on satin charmeuse, pieced them together, and pressed under the raw edges. I sewed it on with silver thread that matched the Celtic knot design.


Thursday, November 8, 2012

Four Tickets to Christmas

I know- I am way behind on the 31 days of sewing tips. I have been overwhelmingly busy getting a show ready for the stage. We open on Thursday night in Mayville, NY at the Chautauqua Inn & Conference Center- the first weekend of a 5 stop tour. The show is called Four Tickets to Christmas. It is set in 1905. Many of the costumes are made from vintage patterns I scaled to size with apportioning rulers (see Pattern Drafting, Edwardian Style). 

If you live near one of the venues, come see it. Did I mention it is a dinner theater? Great food, too. Tickets are available here: http://www.fln.org/events/event/350911-2012-11-08-four-tickets-to-christmas/


The 31 days will resume shortly- thank you for your patience! And I hope to have some decent show photos soon, too.

Tuesday, October 30, 2012

Customize Ready Made

I needed a new purse. I could have made one, but didn't have the time. When I was out shopping I found a purse on clearance that I liked, except for one thing. It had an animal print sash, woven through large grommets around the top of the purse. I looked it over carefully, and determined the sash was easy to remove. I bought the purse. When I got home, I removed the sash and used it as a pattern. I made a new one, suited to my taste and personality. I used fabric from my stash, and the entire operation took only 5 minutes.  

Sunday, October 21, 2012

Favorite Sewing Tools

Everyone has favorite tools. Sometimes they are used as they were intended to be used, other times not. Here are a few of mine.

The bodkin. It beats a safety pin hands down for threading elastic or cording through a casing.


My set of tube turners. This is one of the best things I ever bought. Big or small- as in button loop or spaghetti strap small- you can turn a sewn tube right side out in a jiffy.


I love scissors and have a collection of them.My favorites are the XL Fiskars and the XS embroidery snips.


I have a gridded quilter's ruler with raised lines on the back to keep it from slipping. You can use it like a ruler, or a square, or to mark angles. You can see through it which is really handy, and did I mention this model has a raised grid on the back? The smooth ones slip and slide even with anti slip dots on the back. I love this ruler.

Tailor's chalk isn't used as often as it once was, but I still prefer it over marking pencils and markers.


The ergonomic seam ripper is a huge help if you have arthritis- and even if you don't. It it easy to hang on to, which makes the work easier. What tools do you prefer?

Friday, October 19, 2012

Sewing Books

There are many good books out there on sewing, some general, and many more for niche areas. I love books and own many, so I thought I would comment on a few of them. The sewer's Bible of my collection is The Vogue Sewing Book.  I actually have two copies, an older one and an updated version. It covers just about everything from style and fabric choice to hems and seam finishes- plus everything in between. If you can only buy one book, get this one.

 I also own The Complete Step by Step Guide to Home Sewing. It covers curtains, cushions, pillow cases, tablecloths, lamp shades, kitchen items, furniture covers, and more. Heirloom Sewing for Today by Sandy Hunter is a beautiful book. It is not just eye candy, though.   It contains patterns and techniques for a nice variety of projects in the heirloom sewing style. 

I do a lot of historical costuming and have always loved tailoring, so it should be no surprise that I own The Victorian Tailor and The Tudor Tailor. I also own Tailoring: The Classic Guide to Sewing the Perfect Jacket.

What sewing books would you recommend?

Sunday, October 14, 2012

Perfect Double Topstitching

Getting two evenly placed rows of top stitching is really pretty simple. You need two spools of thread and a double needle. Schmetz makes them in two different needle widths.


Make sure you have a foot with an opening wide enough for both needles to enter without hitting the foot. Replace your regular needle with the double needle. Place the spools of thread side by side on the thread posts. (Hint- if you only have one spool of the desired thread, wind a partial bobbin of that thread to serve as a second spool.) 


Holding the threads together, thread your machine normally- as if they were one thread. When you get to the needle, separate the threads and run one thread through each needle. Experiment with stitch length on a scrap before top stitching your garment.


Friday, October 12, 2012

All Threads are not Equal

Just like needles, threads are designed for different applications. The list includes embroidery, invisible, metallic, top stitching, buttonhole, denim, leather, upholstery, elastic, serger, quilting, bobbin (plus whatever I left out!) and the most commonly used thread, the all purpose variety. They are made from different fibers, too- cotton, silk, rayon, and polyester being the most common. 

A Rule of Thumb- if you are doing something named on the thread spool, that thread will probably do a better job for you. For example, top stitching thread used with a top stitching needle produces a stitch line made to be seen in a beautiful way. Done with all purpose thread and needle, the same stitching blends into the garment. Upholstery, leather, and buttonhole threads are much heavier than all purpose thread. Embroidery thread has body and luster. Bobbin thread is thin and lightweight, designed to eliminate bulk on the back of an embroidered piece. Hem your jeans with a heavy needle (size 16 or 18) and jeans thread (I have it in 2 colors, denim and orange) for a ready to wear look. Also, using the wrong thread and needle type may cause your machine to stitch improperly. Make choosing the right thread part of your project planning process- you will be surprised how much better your work looks!

Friday, October 5, 2012

Pressing Aids


There are two categories of pressing aids- liquid or spray formulas you apply to the fabric, and objects used to shape or protect the fabric. The latter category includes pressing hams, which enable you to press a curved seam, and the oblong version which is great for pressing sleeves. A press cloth placed between the iron and the fabric prevents scorching or the creation of a shiny surface. A thick towel or needle board is used when pressing velvet- the fuzzy side faces the towel.


My two favorite liquid pressing aids are Faultless Premium Starch and a simple vinegar and water solution (50/50) in a little spray bottle. They both add body and crispness to your work. Starch does stain some fabrics, so always test it on a scrap first. I have never had a problem with the vinegar solution, but I would recommend checking that on a scrap first as well. The vinegar solution really is amazing and has become an indispensable aid in my sewing room.

Next tip- freezer paper in the sewing room

Thursday, October 4, 2012

31 Days of Sewing Tips

I am jumping on the #1 Days of... blog train with what will hopefully be helpful sewing tips. There are lots of participating blogs on a wide diversity of topics. If you would like to check some of them out, go to http://www.thenester.com/2012/09/31-dayers-2012.html and scroll down to the large square icons representing each of the pages. Without further ado...

Sewing Tip #1: Make friends with your iron. Did you know there is a difference between ironing and pressing? Ironing is using the iron to remove creases and wrinkles by sliding the flat face of the iron back and forth across the cloth. Pressing is a slow, deliberate process. Let's say you are pressing a quilt seam open. Place the seam on your ironing board, wrong side up. Open and press down with your fingers. Place the iron firmly on the area for a few seconds, then lift- do not slide- the iron off the cloth. Repeat for the next section. Do not move the quilt block until the fabric is totally cool. If necessary, flip it over and repeat from the right side of the fabric. Fabric is more easily shaped when warm and moist, and you can distort your work by moving it when it is warm. 
Tomorrow's tip- pressing aids. See you then!

Thursday, September 27, 2012

Pattern Drafting, Edwardian Style


For years I have drooled over books like The Edwardian Modiste, the Voice of Fashion, and 59 Authentic Turn-of-the-Century Fashion Patterns.


 I have never been good with math, and could not grasp how one turned those doll sized patterns into something that would fit a person. 


This summer I found a video tutorial by Jen of the blog http://www.festiveattyre.com/ in which she both explains and demonstrates the apportioning rulers in the Edwardian Modiste. While watching it, the little light in my brain turned on and suddenly it all made sense. Whoever developed that system was a mathematical genius.

Now I am happily drafting patterns. 


I am currently working on a show set in 1905, and being able not only to use these patterns but to draft them to the size of the intended wearer is fantastic. They are short on directions, though, which you might find a bit daunting if you are not a confident sewer. The first pattern I drafted is a simple corset cover, and it turned out quite well.


 I have also drafted this one, and hope to get it cut out this week. I am really looking forward to making it up.


Monday, August 27, 2012

Sewing With Kids


I have two nieces who enjoy sewing projects. I don’t get to see them as often as I would like, but when I do see them, we sew. It is a great opportunity to pass on skills, knowledge, and passion. Accomplishment also builds a child’s self esteem in a way nothing else can.  

This time I showed up with a couple simple patterns, a large bag full of scraps, some small pieces of yardage, thread, sewing supplies and my trusty Bernina. 


These two girls like accessories, so we made bags and key chains.They made their own decisions about what to make, as well as style and colors. For the record, they are 9 and 11 years old.

If you are fortunate enough to have young sewing enthusiasts in your care, here are a few things to keep in mind:

-Mistakes are normal. Use them as an opportunity to teach. Most sewing mistakes can be fixed. The sooner they learn that, the better.
-Foster creativity. If the child picks a fabric or a combination of colors you would never use, don’t sweat it. You might be surprised at how well the project turns out.
-Don’t tell them something is too hard. If you think something is beyond their abilities, explain the steps involved without condescension. If the child doesn’t balk, move forward. You might be surprised. Adults often underestimate children.
-Don’t exclude interested boys. Some of the world’s greatest tailors and designers are men. Both of my sons can sew, and one of them won a blue ribbon at the fair.
-Don't do it for them. Teach them how to cut out a project, but let them use the scissors. Teach them how to use a sewing machine, then let them "drive." The same holds true for pins and seam rippers. You might occasionally need to lend a hand, but that should be all.
-Be patient.
-Be flexible.
-Stay positive.
-Praise their efforts.
-Keep it fun- for ALL of you. Don’t stress over imperfections or criticize their choices. Find the balance between teaching correct technique and letting the little things go. Someday they may look back on these moments as some of the best times of their childhood, even if sewing never becomes a major part of their lives. 

So how does the story end? Kayla chose a fabric sample that both surprised me(not what I expected of an 11 year old!) and was too small for the pattern. We cut down the size of the bag to fit the fabric. The material she picked made up into a really nice bag.


Emily decided she wanted the quilt block look. She chose four fabrics, so I made her a cardboard square to trace around. Her bag took longer to complete, but I pointed out to her that she had to make fabric before she made the bag.


They both wanted initials on their bags.


After that we made animal and fabric rose key chains to dangle from their bags. All in all, it was a very satisfactory day.


Monday, August 13, 2012

The Extreme Sewing Room Makeover

The Medieval Wedding is behind me. We took a short vacation. I cleaned my house, paid the bills, and then tackled It- the Extreme Sewing Room Makeover. It has been a long time coming. As my business grew, my never very big sewing room shrank dramatically. My makeshift sewing furniture had aged. Plastic bins and drawers sagged so they were nearly impossible to open. The 8 ft folding table that held my two machines featured peeling veneer held in place with scotch tape, and vibrated so badly sometimes that feet fell off my machines while they were running. It was time.

My husband suggested moving the massive old step back cupboard that housed fabric into another room to free up some space. Since we had just delivered a couple pieces of furniture to our daughter, we had the space for it in her old room.

I had been looking at sewing furniture for months. The commercially made pieces were all either too big, too small, and/or too expensive. We had even looked into having something custom made. Then one day I walked into Staples for office supplies and saw just what I needed. Why hadn’t I thought to look at office furniture before? I brought it home.

It required assembly- lots of it. 


In addition to the usual tools, such as a screwdriver and hammer, it required a second person. I knew I married the right man when he looked at it and said, “This is great! Whoever designed this thinks just like me.”  I became the second person as he took over (no complaints!) and I acted as the Vanna White of kit furniture, supplying screws and other miscellaneous parts as needed for the next three hours, occasionally even lending a hand.


I also purchased a six hole wooden storage unit with canvas drawers and a wicker like pseudo file cabinet. 24 hours later, I had sorted through every piece of fabric, lace, stabilizer, netting, thread, etc that was in the room. I threw away a garbage bag full of hopelessly small scraps. I have an L shaped, heavy duty table with a smooth, snag free top that comfortably holds both machines.  My sewing and embroidery supplies are in order- all for about $300 and some elbow grease. I am brimming with plans for new Etsy items and my next show. Bring it on, I am ready! 


Friday, August 3, 2012

Medieval Wedding in the Woods

I spent the better part of May, June, and July making clothing for a Rennaissance themed wedding. I made about 75 garments to clothe 20 of the 24 participants, including bride, groom, men and ladies in waiting, children, and parents. It was hard work and I learned some things along the way, but overall I was happy with the results.


The wedding took place in a woodland chapel created by the bride's father.


The bride and groom enjoy attending renaissance faires, and the wedding resembled one, from the proclamation style invitations to the castle wedding cake. Many of the guests dressed up.


A castle wedding cake- of course!


I am looking forward to a little time off, but I enjoyed the time I spent sewing for this bunch.