Wednesday, March 28, 2012

Little Black Dresses

I have made a number of little black dresses over the years. They are wonderfully versatile. I confess to having favorites among the ones I have made- here are three of them.

A couple years ago, I made a little black dress that was inspired by a grey Vera Wang wedding gown. 


The long, many layered gown was cropped into a knee length skirt made of georgette and taffeta. The strapless bodice gained gently curving halter straps. Draping and pattern making for this dress was somewhat challenging, but I was quite satisfied in the end.

Another dress- and a sleeveless over coat- was inspired by an AlexanderMcQueen ensemble. The base dress was a 1950’s style black taffeta number with lots of tulle netting under the skirt to make it poufy. 


The coat was fun to make- I had to call up a blend of my design and tailoring skills.


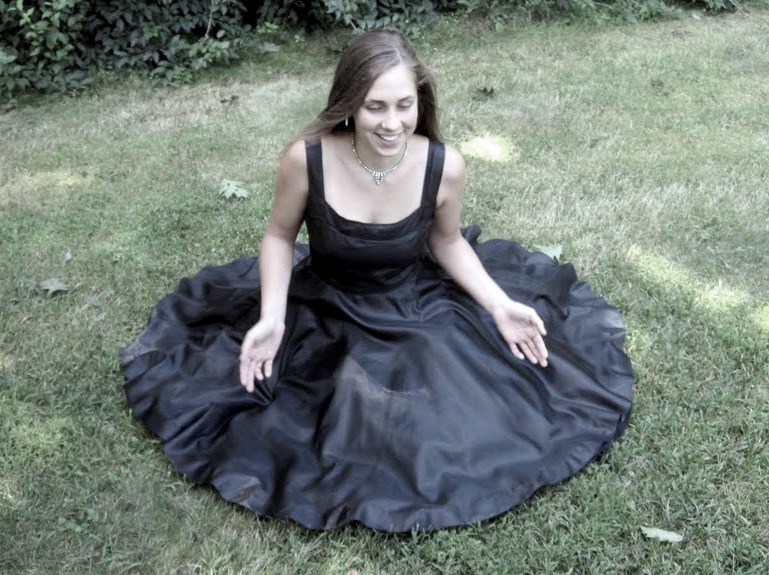
Dress number three made its’ debut in December 2011. A friend and I had attended a concert by Charmaine in August. Her dress was the inspiration.


The dress she wore had layers of zipper trimmed tubes overlaying the skirt. Katie really liked it, so the journey to create a unique version of it for her began. We played with several different design ideas and several different bodices before we settled on this one. 


We decided to add a shrug that could be worn with the dress in cool weather, or with jeans, or anything else. The shrug is available as a custom made item in my Etsy Shop, where there are more detailed photos.


Long live the little black dress!

Sunday, March 25, 2012

The Celtic Shrug

Every now and then I make something that I really love. The Celtic Shrug is one of those pieces. The idea grew out of a black shrug in a similar style that I made for a friend. Both shrugs were made of high quality pleather, and both featured specially made lace embroidery that I created with my embroidery machine. That is where the similarity ends. The brown shrug was destined to be the Celtic Shrug from day one. In my mind, I could already see the rich brown pleated taffeta on the ends of the lace sleeves.

I knew what color threads I wanted to use for the Celtic knot on the back. The hardest part was locating some really nice brown taffeta for the pleats and lining.

I started by making the embroidery on a piece of netting.
Once I cut out the shrug pieces, I sewed the embroidery to the center back, and cut out the pleather behind it ever so carefully. 


I added an inner layer of netting for stability. Once it was all assembled, I cut a hole in the lining behind the embroidery and turned under the edges. 


The sleeves are my favorite part, I think. Or then again, maybe it's the back. The shrug lasted one whole hour in my Etsy Shop and seems to have found a happy home.  J


Thursday, March 22, 2012

An Heirloom Christening Gown for Eleanor

The phone rang. The conversation started like this:
“Could you make me a christening gown? My first granddaughter is getting christened. We want something that we can hand down as a family heirloom.” 
She also wanted a bonnet to go with the dress. It has been a couple years since I did any heirloom sewing. I love doing it, so even though my schedule was packed I agreed to take on the project. She sent me a picture of a style they liked, then we chose fabric- the traditional batiste- and I went to work.
First I made a zillion pintucks.


Next, I made the dress parts- bodice, skirt and sleeves. The components were embellished with white on white heirloom style machine embroidery. In addition to lots of tiny pintucks, I did some eyelet work, folded tucks, lines, and floral vine stitches.


Here's a close up of the finished bodice.


I added a pleated flounce to the bottom of the skirt- I like the way it turned out.


Next came the bonnet. I adapted an old pattern I have used many times, and covered it with pin tucks and embroidery. 


The bonnet brim is trimmed with lace and silk ribbon roses.


The project is done, and Eleanor's grandmother is happy. 
So am I.


Tuesday, March 20, 2012

From Simple to Sassy- A Great New Dress!

Usually I write about my own work, but not today!  Bernina USA is holding a competition called the We All Sew Challenge. The idea is to turn a wedding or bridesmaid's dress into something new and fresh. My friend Katie entered, and I think she did a great job turning a very plain bridesmaid's dress into a fantastic little dress that she can wear for a wide variety of occasions. She is in, and now needs votes. Here is the before picture.


and the first of several after pictures- here is the new the bodice. she recut the shape, then added embroidery.


here is the back. the neck closes with a vintage shoe button & loop.


and finally, the full view.


It turned out great, didn't it?
If you are willing, and I hope you are, you can vote for her here:
Simple to Sassy- Vote here!

Monday, March 19, 2012

The Steampunk Fascinator- Finished!

Place your pattern pieces on the Peltex, weight them down, and trace around them. Sandwich the Peltex between the two fabrics, and press to activate the adhesive. Then you can trim the fabric to shape, leaving it @ ½” bigger than the Peltex.


To assemble the crown, simply butt the edges of the Peltex together. Cut one fabric edge flush, overlap the other one, and glue in place with Fabritac. Repeat on the inside. Cut the fabric on the teardrop (top) flush with the Peltex, and insert it into the top of the crown, using the excess fabric as a base for the glue. Cut a hole the size of the crown in the center of the brim. Push the excess fabric on the bottom of the crown through the hole, clip, and glue to the underside of the brim. Bind the edges of the brim and crown with a thin strip of knit and Fabritac. Add ribbon and your choice of embellishments. 


On the underside, glue a circle of felt over the hole. Once that is dry, glue an alligator clip to the underside of the hat brim. Hold it in place with clothespins while the glue dries. 


That’s all there is to it!


Friday, March 16, 2012

Making a Steampunk Fascinator

A lot of what I make ends up on the stage. This means that sometimes I can cheat a little bit, and complete an otherwise time consuming job in a couple of hours. Such is the case with this fascinator- a sort of miniature top hat.  I am currently working on a production of Seussical. The costumes for this show blend human and animal attributes in a funky way. I thought it would be fun to introduce a little pop culture into the costuming- steampunk in this case, and hip hop in another one. Warning- if you are a real milliner, you should probably stop reading now. No real millinery techniques were used in the creation of this fascinator. You have been warned!

I started by making a rough pattern. I wanted to make a miniature top hat with a somewhat distorted shape and a brim the size of a teacup saucer. Using brown craft paper, I cut a rectangle and worked in front of a mirror, trimming it until I got the approximate height and girth that I wanted. I squared it up, laid it out on my work table and cut slits, which I then overlapped and taped in place. 


As you can see, this changed the shape from a traditional stovepipe to a tapered top hat. I placed this on another piece of paper, traced around it, added a little size to make up for what I lost in the adjustments, smoothed the curves, etc. I taped the butted edges together so I could make the next piece- the top. 


I wanted a teardrop shaped top.  


Craft paper is nice to work with, because it has enough body to hold it’s shape while you are experimenting, enabling you to get a realistic idea of what it will look like once you’ve made it up. I then traced a small saucer for the brim, and trimmed it into an oval shape.


The base I use for this type of hat is Pellon Peltex 72F, a double sided fusible ultra firm stabilizer.  Other supplies include fabric, ribbons, trims, buttons, an ostrich feather, an alligator clip, clover clips, clothespins, and Fabritac. Knits and felt are the simplest to work with because they stretch and they don’t ravel.


next time- the completed project.

Tuesday, March 13, 2012

The 1912 Evening Gown- Finished!

Choosing the trims was fun.


Two trims were applied to the neckline, as well as a narrow velvet ribbon around the bottom edge of the georgette skirt. Last of all, I hand stitched the center back lining along the zipper opening.


Looking at it on the dress form, I noted that the two layers really gave it the feel of a period dress. One night while watching Downton Abbey, I realized that I had a couple items in my Etsy shop- a choker and a black lace cardigan shrug- that would go very nicely with the dress. The choker isn’t as elaborate as some of them were, but it has a similar feel, and the lace shrug has the right shoulder lines for the period. I could hardly wait for my model to arrive!

The finished dress fit Katie perfectly. It is not floor length on her when made according to the pattern (she is @ 5’ 6”) but she really liked the length. 


We tried both it with and without the shrug. 


I think some of the most beautiful and classiest clothing is made from vintage patterns with a modern twist, and this is a great example. 


I am happy with the finished product, and have added the gown to my Etsy Shop.  I have obtained permission from Janyce Hill of VPLL to sell garments made from this pattern, and I think it will be a great way to plug her Titanic Sewing Project.  Maybe the dress will get to attend a Titanic event!

Speaking of Titanic events, there are Titanic Memorial events, balls, and dinners all over the United States, Canada, and England this year, many of them in April. I have posted links to a few of them below. If you know of more, please feel free to post the links as comments. 


Up next time.... a Steampunk Fascinator.

Saturday, March 10, 2012

The 1912 Evening Gown- Putting it All Together

When I cut out the pattern pieces, I eliminated the back overlap as I intended to install a zipper. I rolled the edges of the georgette before installing the zipper, the entredeux lace, and assembling the garment. The pattern pieces went together easily. 


Once the body of the lining was done, I made the pleated flounce. Using a gridded ruler and rotary cutter, I cut a piece twice as wide as the directions instructed, then folded and pressed it in half before pleating to give the bottom of the dress some weight.  


I do not own a pleater, so gave it a try with my ruffler foot, as it actually makes small pleats, which I then pressed in place. This method worked reasonably well, but it was tedious.


Once the lining and outer dress were assembled, I pinned them together as you would a lined vest, leaving the shoulder seams open for turning. I clipped and trimmed the seams, then turned and pressed the dress. 


Another change I made from the pattern is the armhole seam allowance. Sewing a fat 5/8” seam widened the formerly tight arm openings enough to make them comfortable for the modern wearer. 
next time- the finished dress. 

Wednesday, March 7, 2012

The VPLL Titanic Sewing Project

Along with about 400 others, I am a test sewer for the Vintage Patterns Lending Library’s 1912 Titanic Sewing Project- http://vpll1912project.org/.  The idea is to test the patterns transcribed from the 1912 La Mode Illustree by Janyce Hill of VPLL by making a muslin to see if the pieces fit together properly and work as a garment. My first test pattern is the Princess Slip.

Many of the sewers are making costumes for their own use, as they do reenactments or attend Titanic memorial events. I design and make costumes all the time for theatrical productions, but I am not inclined to wear them myself. I would never make a detailed garment like this slip unless someone, such as the audience, got to see it. I am also a big fan of (potentially) wearable muslins. As I studied the pattern, I realized that with a few small changes it might yield a rather nice evening gown. I dug through my stash and found a leftover piece of my favorite black silk georgette that looked large enough.  My decision was made.

My grandmother was a professional seamstress back in the days when every hem and seam finish was done by hand. She owned what then was a top of the line sewing machine. If she’d had the tools at her disposal that I have, I am certain she would have used them.  I feel no guilt in allowing my Berninas to do so much work that was once done by hand.

The biggest problem was actually assembling the pattern pieces. I have downloaded and assembled a number of other e-patterns. Assembly generally requires 5 minutes or less. Some of these pieces have little or no markings on them, and if you get them out of order(which I did!) you’re sunk. The corner markings didn’t print on my printer, either. Page numbers and/or piece ID on each page would fix this problem.

I opted to make the lining and pleated flounce in black taffeta. It was not available locally (by local I mean the JoAnn’s that is 50 miles from my house). Fabric.com informed me four days after I ordered that they didn’t have the quantity I needed.  

Thankfully, http://www.fashionfabricsclub.com/ did. It is excellent quality, wider, and as a bonus was less expensive than my first order. I could not find black insertion or edging lace locally that was even remotely appropriate, either. I bought a piece of black overall lace and cut it into strips.

 I chose this lace because I thought it had a tight enough weave to be stable when used this way. 


It required careful handling, but it worked.  I cut up the lace while my Bernina did a spot of embroidery on the front of the gown. Then I sat down to sew.